
Focus Stacking Explained
How images with everything in focus can be created by combining multiple frames.
• December 2021 issue
Imagine being able to create a photograph with everything in razor-sharp focus. That’s the promise of the technique known as focus stacking. The process begins by making a series of photographs where the plane of focus is shifted to progressively more distant planes in the subject. In post-processing, software is used to combine the photos into a single image with impossibly deep focus.
The focus shift/focus stack process differs from making a single photo with a lens stopped down to a tiny aperture in a couple of important ways. First, the finished image has a greater depth of field than would be possible even with a lens stopped down all the way, especially when doing close-up photography with a longer focal length lens like the Nikkor Z MC 105mm f/2.8 VR S. Second, by using the lens at the aperture where it’s sharpest, you avoid the inevitable loss of sharpness that comes from using a lens at its smallest apertures.
This technique works only when the subject doesn’t move at all and the camera or lens moves only in tiny amounts. A tripod or other support is necessary. It works best when the lighting is consistent from frame to frame. An object in the foreground will block the camera’s view of what’s immediately behind the subject. The foreground object goes out of focus as the lens focuses on the subject behind it, and the resulting composite may have a blurred edge immediately around the edge of the foreground object.
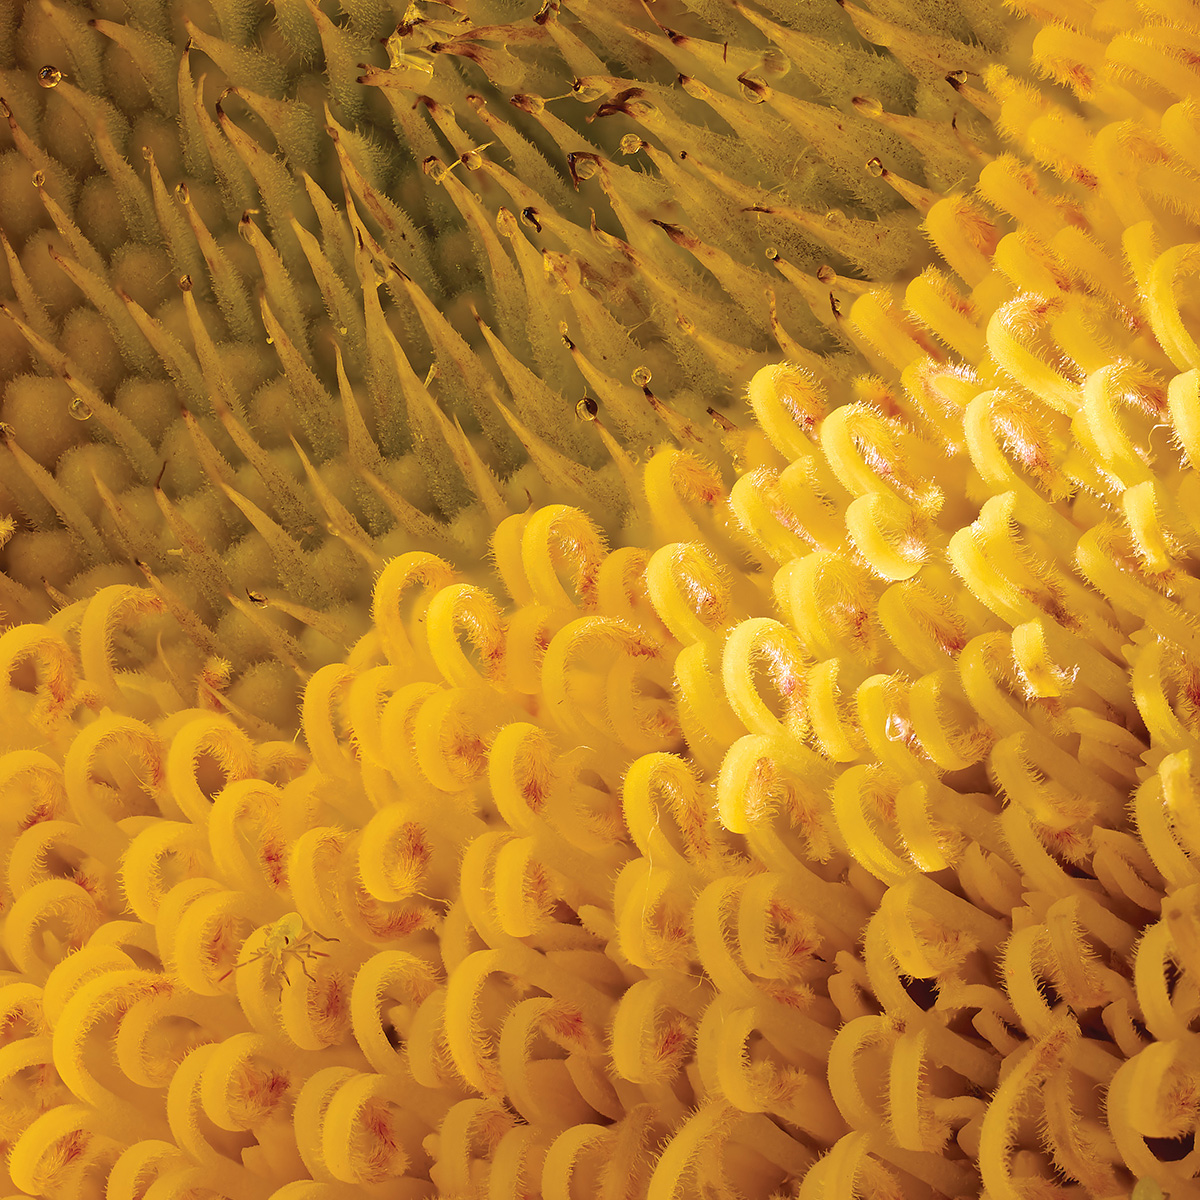
This focus stack was created with 14-bit losslessly compressed NEF files, converted to TIFFs in Capture One, and assembled using Helicon Focus software.
I photographed this sunflower with the Nikon Z 7II and Nikkor Z MC 105mm f/2.8 VR S lens. It’s a stacked composite using the camera’s focus shift feature to capture 100 frames. I selected the nearest point I wanted in focus, and the camera automatically stepped in user-specified increments. I chose the smallest increment available and shot an initial 50 frames. When I examined the last frame in that sequence, the depth of field didn’t extend far enough into the background, so I had the camera shoot another 50-frame sequence starting where it had finished in the first set.
The next step was to process the 14-bit losslessly compressed NEFs in Capture One and output them as TIFFs. I used Helicon Focus software to combine the 100 TIFFs into the composite to make the finished photo and did very light retouching in Photoshop CC.
I set the camera for manual exposure at f/8 for 1/3 second, ISO 64. I lit the sunflower using a daylight balanced Godox Silent LED Video Light UL60 with its standard reflector, a barndoor on the light, and a small reflector near the camera.
Ellis Vener is a contributing editor.
Tags: lenses macro photography technique

